 Not too long ago, while shopping, I happened upon a huge canvas I thought would be perfect for my daughter’s room. {We just rearranged her room and she needed something over her bed.} It was contemporary with a camera painted inside. {She wants to be a photographer.} As usual, it was more money than I was willing to pay. {I’m a tight wad!} I ran across two canvases in the attic last week. We used them as decoration for my daughter’s surf themed room several years ago. I had a difficult time finding surf paraphernalia at the time; so I decided to make these very simple canvases using paint and 12×12 scrapbook paper {mod podge.} Well, thanks to all my blogging friends, I have learned to re-purpose, shop at home or make over things I already own. I decided I could re-use the canvases and make my own version of the canvas I saw at the store. In addition, I determined I would surprise my daughter with the canvas as a gift for her birthday. This was a great motivator to get the project done.
 ![]()
 The first thing I did was tear off the 12×12 scrapbook paper.
 I tore off as much paper as I could. Instead of getting frustrated, I finally decided I liked the dimension the stuck on paper would give to the painting.
Next, I sprayed on some white primer.
 While the primer was drying I decided to work on the camera part of the painting/wall hanging. Using some clip art on my computer, I printed out a camera. I knew I wanted to split the camera between the two canvases. So I used the banner print option.
 I also knew I wanted to use some very cute quilt square fabric we bought while we were in Iowa this summer to make the camera. This meant I needed to make patterns for the pieces of the camera. I pulled out my tracing paper and began tracing the camera.
 Next, I cut out the traced camera pieces to make my patterns.
 At first I used pins to hold my patterns onto the fabric. I had difficulty with the pattern shifting around while I was cutting the fabric. I switched to using my re-positionable scrapbook glue dots to hold the pattern onto the fabric. It worked famously!


 After the primer dried I took my print out of the camera and tried it out on the canvas to see if I liked the size, etc.
 I took the ‘master copy’ {the one you saw earlier on the primed canvas} of the camera and began placing the pieces onto it.
 This is the right side of the camera.
 I decided to “antique” the edges to of the fabric to give it some depth.
I did this by using a makeup sponge with brown stamp ink and dobbing the edges to all the pieces of fabric I cut out. This is the end result before gluing the pieces onto the canvas.
 For my next step I used my new favorite paint…Annie Sloan’s Chalk Paint in Old White. I painted on two coats. The end result made the canvases look brand new again!
At this point you can’t even see the paper that I couldn’t pull off in the beginnning.
 I chose 3 colors to paint the background with. These colors are both in the camera fabric and in her room’s drapes. Again, I pulled out the makeup sponges, dabbed on some paint and dragged them across the white painted canvas. It was at this time when the earlier stuck on paper layer created a dimension under the paint. I had so much fun painting that I didn’t stop and take photos of the process. {Sorry} I really like how it looks!
 After the paint dried, I Mod Podged the fabric pieces onto the canvas. I brushed two layers of Mod Podge just over the camera fabric pieces. To finish it off, I hot glued a scrapbook/decorative brad {tore off the flaps} to where the camera button is. {You can barely see it, but it’s on the right panel at the top in the photo below} This whole process took me about a week to complete. This means I took snippets of time throughout each day to work on it. It did not take me 5 days, 12 hours each day. LOL Thank goodness!
 Here it is complete!
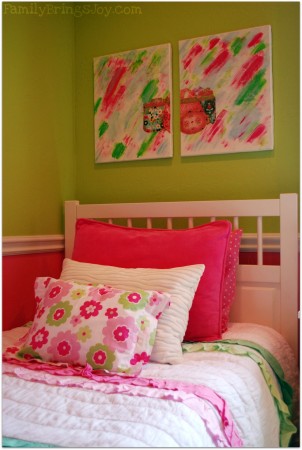
 Here they are installed over my daughter’s headboard.
 I can’t believe I did it! Project complete…what do you think?
Linking Up:
I love a makeover,


I LOVE that, Shannon! Great job!!!
WOW! What a great Idea! I love working with canvas’
 – A Flower in Adversity
Came from Tip Junkie… and glad I did!
Come say hi (and get a great freebie) anytime at:
http://www.periwinklepixies.blogspot.com
http://www.periwinklepixies.etsy.com
~Jacinda
Jacinda Cote recently posted..Free Printable!
Super cute!! And what did your daughter think of it?
Very, very creative. I love that you used such cute prints for the camera.
So so cute, and so original! Love the fabrics you used too
Destri {The Mother Huddle} recently posted..Tutorial ~ Simple Summer Pajamas
Impressive! What a great way to use your quilt fabric!
I am just so impressed, Shan. You did such a great job and I too love the fabrics you used. This was a complex process you used and it seems that you made up the way to do it. What did K think of it? I think you are frugal, not a tight wad. Love, Mom
Looks great. Love the colors… and especially the fact that it’s on two canvases- such a unique touch.
~ Meredith from A Mother Seeking http://www.amotherseeking.com
A Mother Seeking
P.S. Found you through the DIY Showoff.
This week on A Mother Seeking: I Created A Birdhouse Dream House
Meredith Resnick recently posted..Crafty Due to Weather Conditions: Our Welcome Home Birdhouse
This is such a cool art piece and a great tutorial. I am happy to be a new follower!
I would love for you to link your post up at my Savvy HomeMade Monday blog party at http://www.homesavvyatoz.com/blog-party-5/
I also see that you started blogging in the last year. I have a Freshman Friday Party starting this week with helpful tips for new bloggers getting started and a way to shamelessly promote your new site! I would love for you to attend!
Erin of HomeSavvyAtoZ.com recently posted..Savvy HomeMade Monday Blog Party #5
This project turned out great and looks really professional, great job.
Suzanne recently posted..Candlicious-A Daring Bakers Challenge
I am so grateful for the outpouring of generous feedback on this project. It’s kind of surreal. I look at it and think, “Did I do that?” Thank you everyone. Hope it inspires you to do something you haven’t done before as well.
GORGEOUS! Perfect patterns and colors. I would love to have one for myself Well done!
I love it! There are so many possibilities – any object, any colors, you could even do a 3-board design! Great tutorial! I just opened a new party and would love for you to join – its for anything in kids decor – here is a direct link: http://playfuldecor.blogspot.com/2011/08/tuesdays-nursery.html
COming from Creative Bloggers Party (I’m co-hosting with SJ!)
Great job!!
Nan @ Playful Decor recently posted..Co-Hosting Blog Party Hop with Homemaker On A Dime!